If ignored, a leaking toilet tank can quickly turn from a minor annoyance to a major household issue, driving up water bills and wasting precious resources. This article delves into the ins and outs of fixing toilet tank leaks, equipping you with both the knowledge and confidence to tackle the problem head-on.
- Discover the main culprits behind toilet tank leaks, including worn-out components and alignment issues.
- Learn how to pinpoint the exact source of the leak using simple yet effective methods.
- Access a step-by-step guide to repairing leaks, ensuring a job well done and preventing future problems.
- Get proactive maintenance tips to keep your toilet tank in optimal condition long after the repair.
By the end of this article, you’ll be well-prepared to handle toilet tank leaks effectively, saving both water and money. Dive in to gain practical insights and ensure your home remains leak-free and water-efficient.
Understanding the Causes of Toilet Tank Leaks
Toilet tank leaks can be frustrating and costly, but understanding their causes can help you address them effectively. Worn-out flappers are among the most common reasons for leaks. Over time, these rubber components deteriorate, leading to ineffective sealing and constant water flow into the bowl.
Another frequent culprit is the faulty fill valve. When the fill valve malfunctions, it can cause continuous water refilling, resulting in overflow and leaks. Regularly inspecting these valves can prevent more serious issues down the line.
You should also consider the misaligned float ball, which regulates the water level in the tank. If it’s not properly aligned, it could lead to water spilling over into the overflow tube, causing unnecessary water waste.
Identifying the Source Before Repairing Toilet Tank Leaks
Before commencing any repair work, accurately identifying the source of the leak is crucial. One effective method is dye testing. By adding a few drops of food coloring into the tank and waiting for about 15 minutes, you can see if the colored water appears in the bowl. This simple test will indicate if the flapper is the leak source.
For a thorough inspection, visual inspections are indispensable. Examine the tank’s parts, including the flapper, fill valve, and float ball, for signs of wear and misalignment. Checking the exterior surfaces for moisture can also help detect external leaks.
By using these practical diagnostic methods, you can ensure that you’re targeting the correct area, making your repair efforts more efficient and enduring.
Repairing Toilet Tank Leaks: Step-by-Step Guide
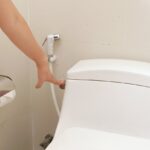
Addressing toilet tank leaks promptly can save both water and money. To ensure you restore your toilet to optimal functioning, follow these detailed steps designed for effective repair. Begin by shutting off the water supply to the toilet. This is typically done by turning the valve located behind the toilet clockwise.
Next, flush the toilet to empty the tank completely. This is crucial for examining and accessing internal components without obstructions. Once the tank is empty, remove the lid and place it safely aside. Take care not to drop or damage it.
Now, inspect the flapper, a common source of leaks. If the rubber on the flapper is degraded, it will likely need replacement. Gently detach the old flapper from the chain and fitting. Take this opportunity to clean the seat where the flapper rests using a cloth, ensuring no debris will cause a poor seal.
For installing a new flapper, refer to product instructions to secure it correctly. Reattach the chain, making sure it has a slight slack without being too loose.
Following this, check the fill valve. If you notice water continuing to fill the tank or overflow, the fill valve could be faulty. Update the valve if necessary by loosening the mounting nut under the tank and replacing the unit.
Before reactivating the water supply, tighten any loose connections around the overflow pipe and fill valve to prevent future leaks.
With repairs complete, turn the water back on and allow the tank to fill. Monitor the components for any further signs of leaks and make adjustments as needed to secure a watertight fit.
Maintaining Your Toilet Tank Post-Repair
Toilet tank maintenance is crucial in preventing leaks and ensuring efficient water usage in your home. Regular checks and proactive care are the key to maintaining a functioning toilet. Start by routinely inspecting the flapper and fill valve.
Every three to six months, conduct a simple dye test by adding a few drops of food coloring to the tank. If the color appears in the bowl without flushing, it indicates a leak that needs attention.
Additionally, check the water level in the tank. It should be about an inch below the overflow tube. Adjust the float ball or fill valve as necessary to maintain the ideal water level.
Ensure all parts are free from corrosion and mineral build-up. If you notice mineral deposits, gently clean them with vinegar or an appropriate cleaner recommended for plumbing fixtures.
Finally, consider replacing rubber components, like the flapper, every couple of years, as they can deteriorate over time. Regular upkeep will not only prevent leaks but also prolong the life of your toilet. Staying proactive with these maintenance tips helps in preserving water efficiency and maintaining a leak-free toilet tank.
Frequently Asked Questions About Toilet Tank Leaks
What are the common signs of a toilet tank leak?
Common signs include hearing water running when the toilet is not in use, frequent tank refills, and water pooling around the base of the toilet.
How can I confirm if my toilet tank is leaking?
Use a dye test by placing a few drops of food coloring in the tank. If the color appears in the bowl without flushing, there’s a leak.
What tools do I need to fix a toilet tank leak?
You’ll need basic tools such as a screwdriver, adjustable wrench, pliers, a sponge, and possibly replacement parts like a flapper or fill valve.
Can I fix a toilet tank leak myself?
Yes, most toilet tank leaks can be repaired with basic tools and replacement parts, making it a feasible DIY project for most homeowners.
How often should toilet tank components be checked or replaced?
It’s advisable to inspect the toilet tank components every six months and replace worn parts as needed to prevent leaks.
Are there any preventive measures to avoid toilet tank leaks?
Regular maintenance, avoiding excessive force on the handle, and prompt replacement of worn parts can help prevent leaks.